After finishing the Self-Driving Car Engineer Nanodegree, I was wondering what was next, and I was trying to apply freshly-acquired knowledge about Kalman filters to try to estimate the positions of planes using data from my Flightaware feeder. It is not an easy task because I had no idea how to model the plane or anything in 3D so far. Just around that time, Udacity announced the Flying Cars and Autonomous Flight. I didn’t know what I was doing, but I knew I need to apply. I was right. I didn’t know, but: it is amazing!

The first term consists of seventeen lectures and four projects. Even when the subject is complicated, it is explained in a way you don’t have to be a rocket scientist to understand it. Don’t get me wrong, there is a lot of math “deployed” here, but it is just the math the minimum you need to give you the tools to understand better the concepts presented. If you like math, this nano degree is for you. The same could be said about programming. Even when the algorithms presented are involved, the sample code and the project setup help you to focus on the problem not on the necessary plumbing to make them work.
Lectures and projects
The term could be separated into four parts:
- Introduction: Introduction to autonomous flight, physical components of flying vehicles, event-driving architecture, the first project(Backyard flyer) and integration example with real drones. Yes, this is a good part!
- Path planning: Path planning introduction and beyond: from A* on a grid to a real-world 3D planning.
- Control: Vehicle dynamics, control architecture(cascade PID controller) and full 3D control.
- Sensor fusion and estimation: Introduction to estimation, sensors(GPS, IMU, etc.) and extended/unscented Kalman filter.
Let’s get into them!
Introduction and Backyard flyer projects
There are three lectures and one project in this section. The introductory part answers a few questions that are on everybody’s mind when you think about flying vehicles: What is a could be a flying car? What are its parts? What type of sensors do they use? We meet our first two professors: Nicholas Roy and Andy Brown The lectures go directly to programming very quickly to get our hands dirty with event-driven programming on the Backyard project. This project implements a finite-state machine using Python to fly a drone on Udacity simulator as if you could do it on your backyard. Here is the state machine representation:
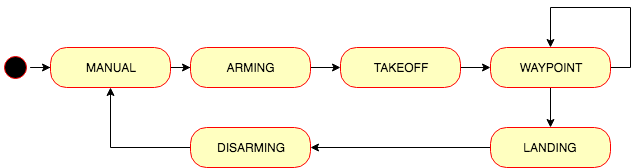
It looks cool on the simulator:
It is interesting to see an application of event-driven and state machine in control. This pattern is known in multiple places on the software world, but the application here makes even more sense to allow the drone to react to different conditions without locking its threads. You can find my solution repo here. The following is another example with a non-squared trajectory:
The communication between your Python code and the simulator is done using Udacidrone, Udacity’s API to communicate with the drone. On a later lesson, they explain how to use the same code you use to connect to the simulator to control two drones: Intel Aero and Cracyflie 2.0. As a student of this program, you will receive a discount to buy Bitcraze STEM drone bundle (This real-world part will be causing another post in the future ;-) )
Path Planning
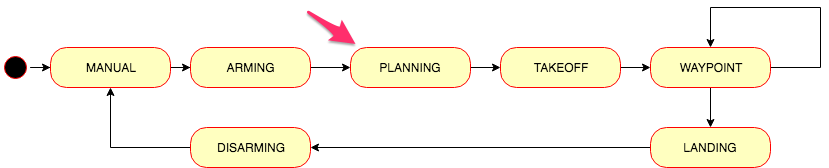
One of the more exciting parts of this nano degree. It goes slowly increasing complexity form A* search algorithm on a 2D grid to 3D motion planning using random sampling, graphs and potential fields planning visiting flying car representation for the first time. There are five lessons and one project grouped here. The project is another excellent example of increasing complexity without overwhelming the students. It builds on top of the Backyard flyer project to plan and execute a trajectory of a drone in an urban environment. A Planning state added to the state machine to calculate the trajectory and send it to the simulator to visualize it:
Here are some sample trajectories using a grid:
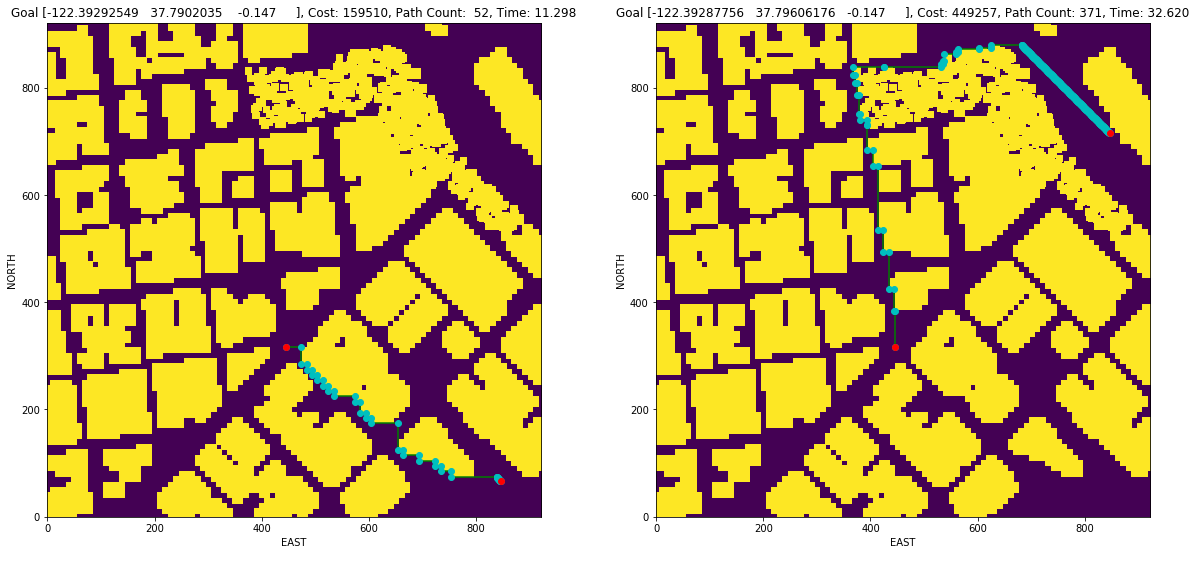
Different A* implementations and pruning have different performance characteristics:

I didn’t have too much time to work on the project, and I could not apply all the concepts explained in the lectures. My solution only implements the planning on a grid and a graph. It is just the tip of the iceberg for these techniques. Hopefully, in the future time will “expand” and I could continue from where I left. Here are a couple of trajectories using graphs:
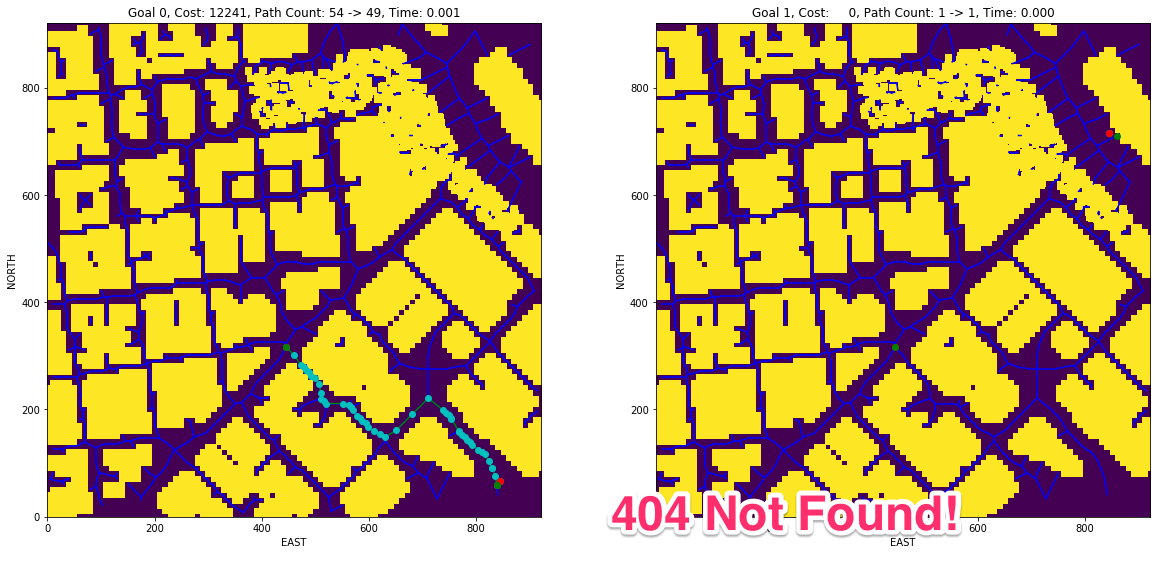
The computational time from a grid to graphs decrease is substantial, but sometimes you can get lost as on the above right figure. The problem is due to the generated graph is not connected. Instead, it consists of multiple subgraphs. Here is a video on the simulator using a trajectory where graphs were used.
Control
The lectures start with vehicle dynamics. The math is getting more exciting but also the physics applied to a vehicle start to ramp up. This section has four lectures and one project. One entire lesson is dedicated to PID controller, and then, things get complicated with a cascade PID controller applied to control a drone on a 3D space. We met our third professor: Angela P. Shoelling. These lessons are challenging. They have a lot of exercises written in Python where we can see modeling of a drone and how to control it.
This section marks the transition from Python to C++ as well. The project consists of the implementation and tuning of a cascade PID controller for drone trajectory tracking. The theory behind the controller design using feed-forward strategy is explained in details on our instructor on her paper Feed-Forward Parameter Identification for Precise Periodic Quadrocopter Motions. The following diagram could be found on that paper describing the cascaded control loops of the trajectory-following controller:
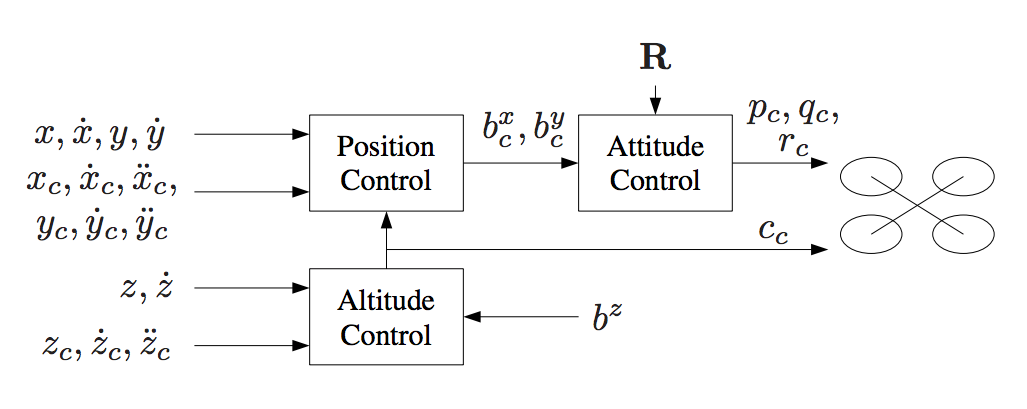
The controller had to be implemented in Python and C++. In the middle of the first term cohort, Udacity decided to drop the Python implementation. My project was finished already when they made the announcement. Here is the link to my solution, and this is a video of Udacity’s Unity simulator:
To implement this in Python was not that hard, the hard was to tune it. There is a procedure explained on the project but you need to dedicate a long time to do it. The good part was I assumed the C++ portion would be easier because I had the experience of the Python implementation. I was wrong. The C++ implementation was ok, but the tuning was really hard. The project had a set of scenarios to help you go step by step on the implementation. That sounds reasonable but to pass a scenario doesn’t mean you have the right implementation or the right parameters. Multiple times I have to go back and test everything again. It is a frustrating experience. For a few nights, I stay late tuning and debugging, but I was not along. There is a Slack workspace dedicated to this nanodegree. Every night, I had the support and help of the community of students who were dealing with exactly the same problem. This was the first cohort; so, we need to find the solution. From those days, I started to have new friends. I would like to thanks all of them for their support. To name just a few: X(陈柱辉 Zhunhui Chen), Luis Yu, Bin Liu and Xinjie Thank you very much!
The C++ simulator is really good in the bad sense of been closer to the reality. It is very easy there to make the drone crash. Here is a video of the last scenario:
To see how good and sensitive this was. Take a look at the following video:
The scenario shown is an additional scenario on the simulator where multiple drones fly. The left half of the screen shows the simulator without a tilt angle constraint on the RollPitchControl. The right half has this constraint in place. You can see some drones misbehaves in the left half. Notice not all of them go crazy: just a few and the same few on every execution. Fun fun!
Sensor fusion and estimation
So far, we were dealing with perfect measurements. On the control project, we knew exactly the state of the vehicle(position, velocity, pose, etc.). The reality is richer than that. Noise is everywhere. The last part of the program is dedicated bring us closer to the noisy reality we live. There are six lectures and one project here. We meet our third professor, Stefanie Tellex, each professor join to give us lessons. The lectures start with an introduction to the estimation problem: noise. Then, we go deeper inside sensor(GPS, IMU and magnetometers(compass)). Once the models for those sensors are clear, we meet the Kalman filter family (Kalman filter, extended Kalman filter, and unscented Kalman filter). There are lectures on GPS denied navigation with more sensor like optical flow and other estimators like Particle filter. This section is one of my favors. Estimation amazed me since I saw it for the first time on the Self-driving car nano degree.
As you might expect, the project consists of implementing and tuning an estimator. In this case an extended Kalman filter in C++. It used the control project baseline and added more scenarios to it and a lot of noise. Here is the link to my solution, and the following video shows the last scenario:
The implementation here is not that complicated. Each scenario introduces another step to the final estimator: a non-linear complimentary filter needs to be implemented based on a linear implementation and GPU, IMU and magnetometer measurements are fusion to estimate the drone state. The last scenario is to bring the control you did on the control project and try it here with noise. That implies re-tuning! Ok, no panic yet. It depends on how “loose” you control tuning was. It could be some minor de-tuning is required to make the control more relax, but not too much.
To show a concept you could see more clearly after implementing the project let’s look at the following figure:
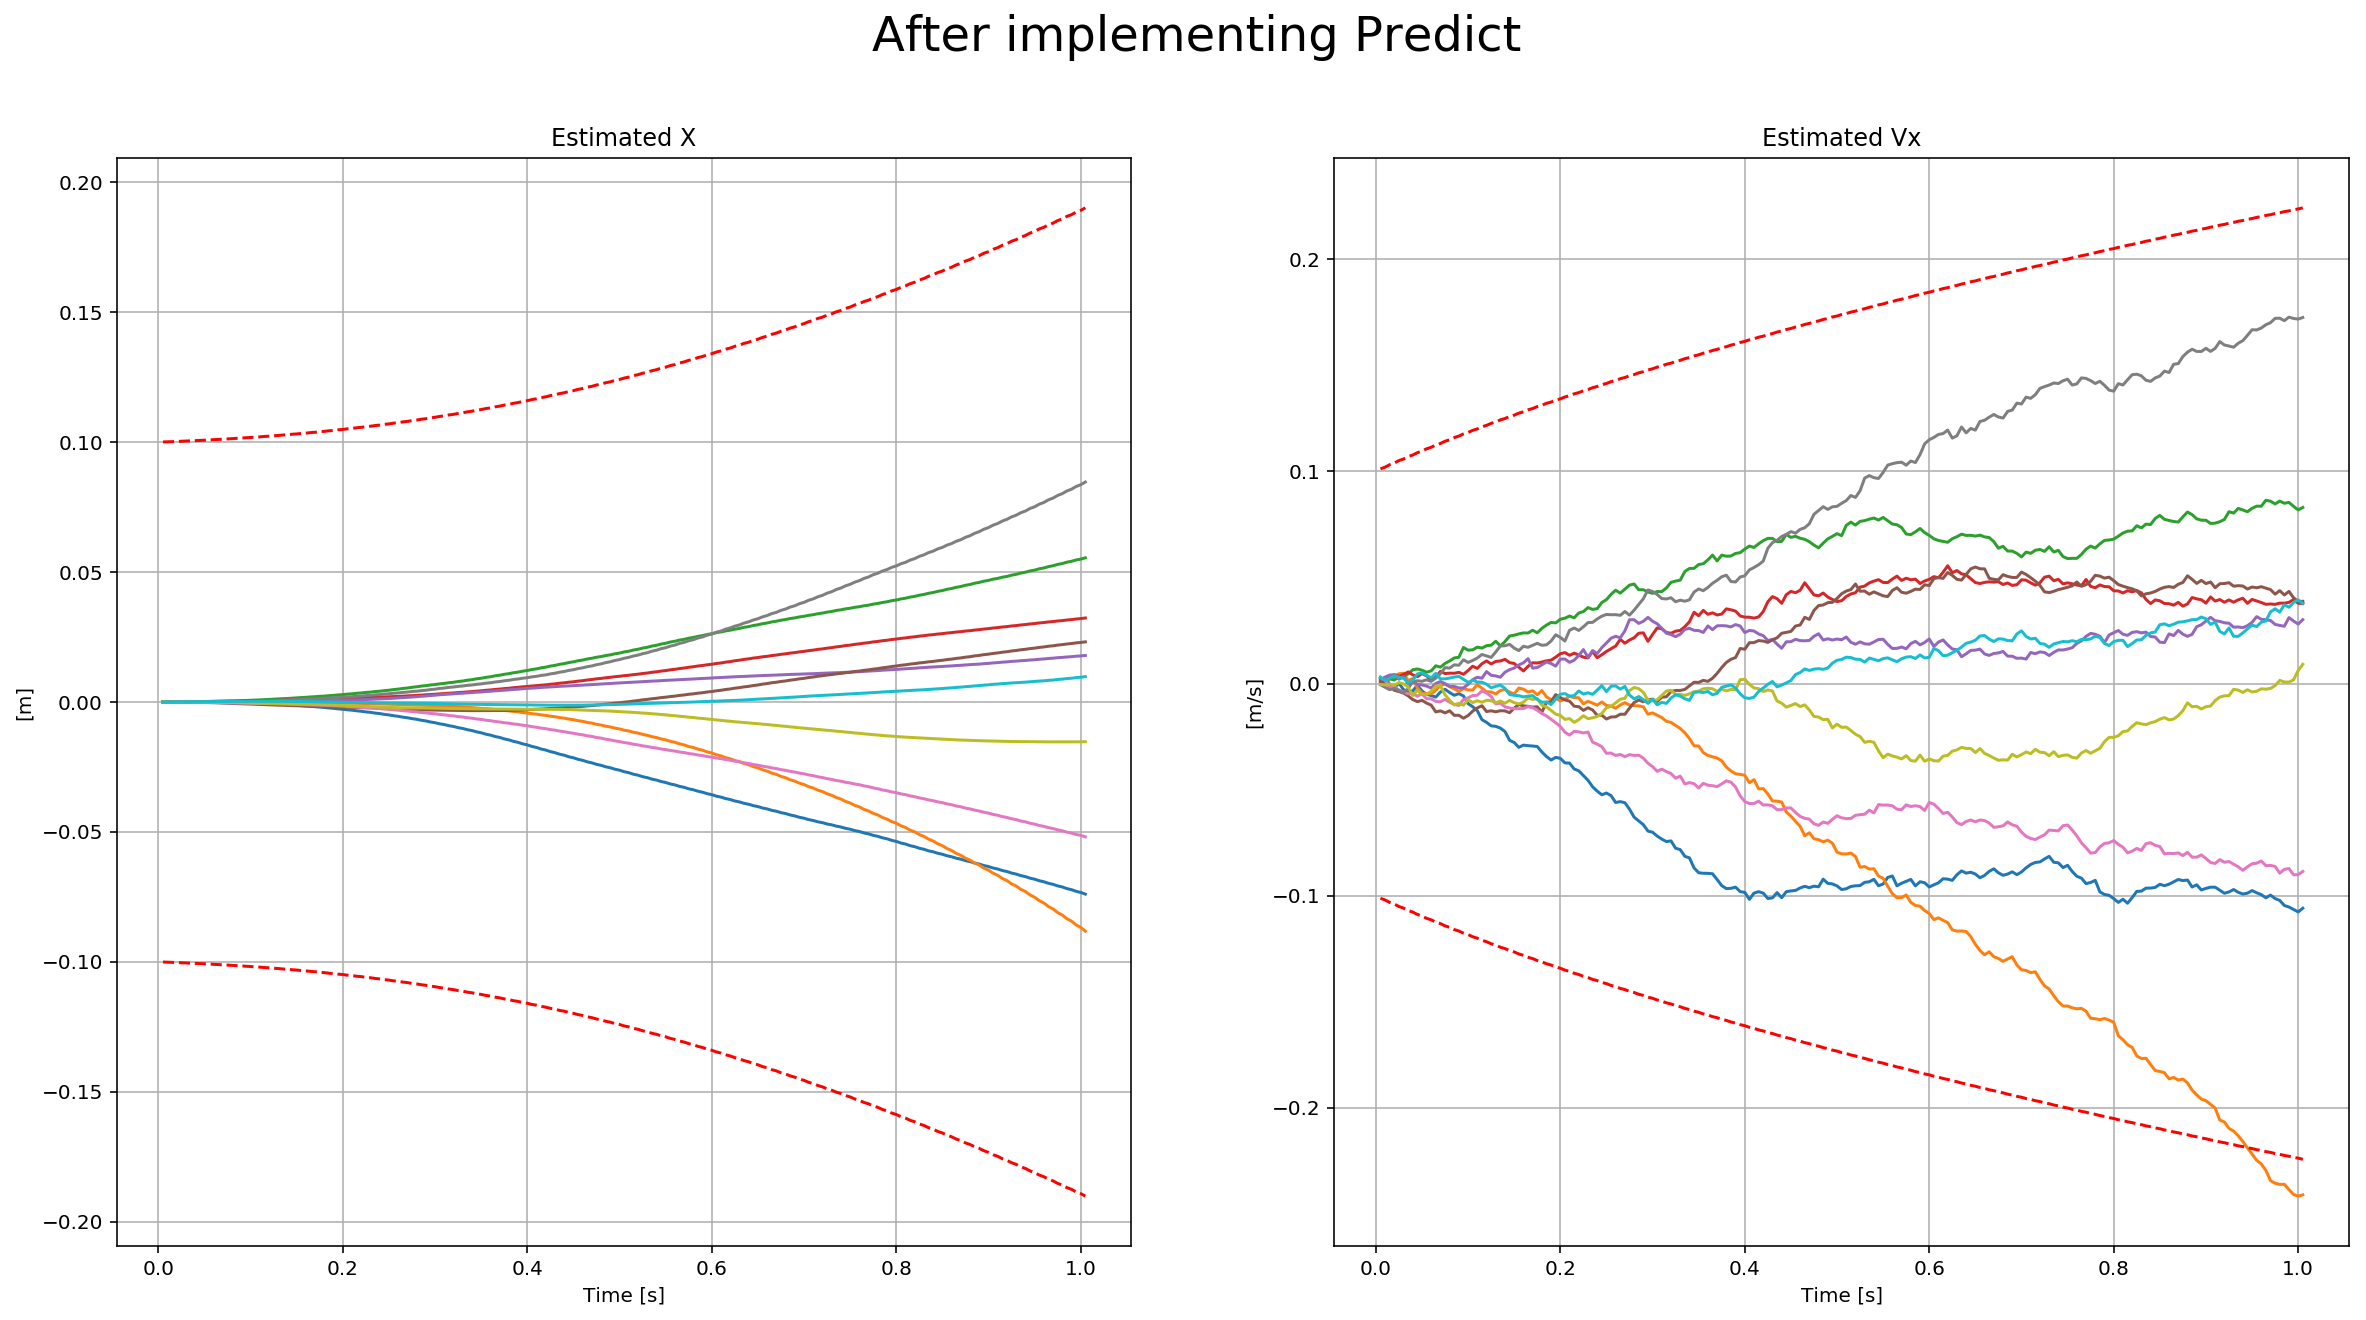
This figure shows the estimated X and Vx values over ten executions after the “predict” state of the Kalman filter. The dotted line is the sigma of the covariance. You can see it grows after prediction. The project asks for an extended Kalman filter only. I was hoping to get to implement unscented and particle filter as well, and we do in Python as class exercises, but it could be a good idea to offer them as part of the project on C++ as optional scenarios.
Conclusions
The FCND is a fantastic program. I enjoyed every single bit of it. My feeling continues to be like looking at the ocean and not seeing the horizon because there are many concepts to master and many more real applications to try, but that is a good feeling!
Thank you very much Udacity for the opportunity to learn about this fascinating world of flying cars and autonomous flight. I haven’t started on my project on estimating the plane position yet, but somehow, I feel it possible now!
I cannot wait for next term to start! See you there!