CarND-Behavioral-Cloning-P3
Udacity Self Driving Car Nanodegree - Behavioral Cloning
Prerequisites
To run this project, you need Miniconda installed(please visit this link for quick installation instructions.)
In order to run the Visualizations.ipynb, Graphviz executable must be on the jupyter path. To installed on Mac OS X, use the following brew formula:
brew install graphviz
Installation
To create an environment for this project use the following command:
conda env create -f environment.yml
After the environment is created, it needs to be activated with the command:
source activate carnd-term1
Project
Goals
The goals/steps of this project are the following:
- Use the simulator to collect data of good driving behavior.
- Build, a convolution neural network in Keras that predicts steering angles from images.
- Train and validate the model with a training and validation set.
- Test that the model successfully drives around track one without leaving the road.
- Summarize the results with a written report.
Rubric points
Here I will consider the rubric points individually and describe how I addressed each point in my implementation.
Files Submitted & Code Quality
1. Submission includes all required files and can be used to run the simulator in autonomous mode
My project includes the following files:
- model.py : Containing the script to create and train the model
- drive.py : For driving the car in autonomous mode in the simulator (This is provided Udacity, my only modification was to increase the car speed on line 47 from 9 to 15)
- model.h5 : Containing a trained convolution neural network.
- writeup_report.md : Summarizing the results
Node:
On my first iteration, I tried LeNet model and nVidia Autonomous Car Group model. This experiments could be found at clone.py. The visualizations I used to create this report could be found at Visualizations.ipynb.
2. Submission includes functional code Using the Udacity provided simulator and my drive.py file; the car can be driven autonomously around the track by executing
Python drive.py model.h5
3. Submission code is usable and readable
The model.py file contains the code for training and saving the convolution neural network. The file shows the pipeline I used for training and validating the model, and it contains comments to explain how the code works.
Model Architecture and Training Strategy
1. An appropriate model architecture has been employed
My initial approach was to use LeNet, but it was hard to have the car inside the street with three epochs (this model could be found here). After this, I decided to try the nVidia Autonomous Car Group model, and the car drove the complete first track after just three training epochs (this model could be found here).
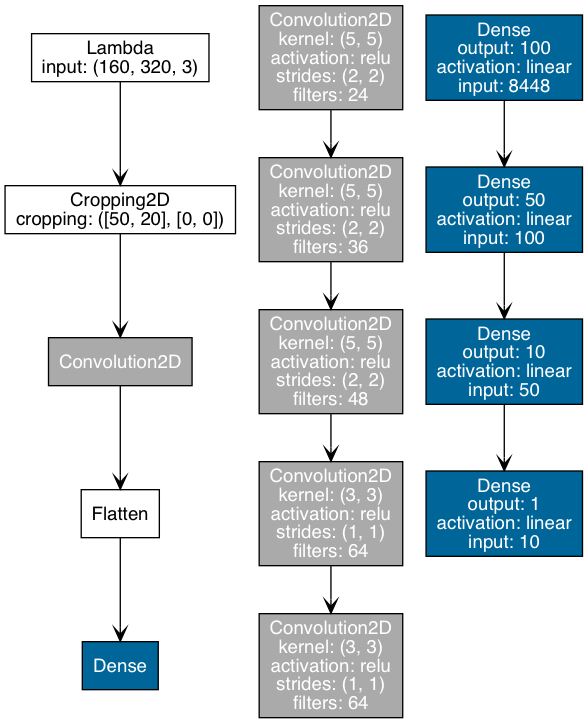
A model summary is as follows:
Layer (type)                     Output Shape          Param #     Connected to
====================================================================================================
lambda_1 (Lambda)                (None, 160, 320, 3)   0           lambda_input_2[0][0]
____________________________________________________________________________________________________
cropping2d_1 (Cropping2D)        (None, 90, 320, 3)    0           lambda_1[0][0]
____________________________________________________________________________________________________
convolution2d_1 (Convolution2D)  (None, 43, 158, 24)   1824        cropping2d_1[0][0]
____________________________________________________________________________________________________
convolution2d_2 (Convolution2D)  (None, 20, 77, 36)    21636       convolution2d_1[0][0]
____________________________________________________________________________________________________
convolution2d_3 (Convolution2D)  (None, 8, 37, 48)     43248       convolution2d_2[0][0]
____________________________________________________________________________________________________
convolution2d_4 (Convolution2D)  (None, 6, 35, 64)     27712       convolution2d_3[0][0]
____________________________________________________________________________________________________
convolution2d_5 (Convolution2D)  (None, 4, 33, 64)     36928       convolution2d_4[0][0]
____________________________________________________________________________________________________
flatten_1 (Flatten)              (None, 8448)          0           convolution2d_5[0][0]
____________________________________________________________________________________________________
dense_1 (Dense)                  (None, 100)           844900      flatten_1[0][0]
____________________________________________________________________________________________________
dense_2 (Dense)                  (None, 50)            5050        dense_1[0][0]
____________________________________________________________________________________________________
dense_3 (Dense)                  (None, 10)            510         dense_2[0][0]
____________________________________________________________________________________________________
dense_4 (Dense)                  (None, 1)             11          dense_3[0][0]
====================================================================================================
Total params: 981,819
Trainable params: 981,819
Non-trainable params: 0
(More details about this bellow.)
2. Attempts to reduce overfitting in the model
I decided not to modify the model by applying regularization techniques like Dropout or Max pooling. Instead, I decided to keep the training epochs low: only three epochs. In addition to that, I split my sample data into training and validation data. Using 80% as training and 20% as validation. This can be seen at this part of the code.
3. Model parameter tuning
The model used an Adam optimizer, so the learning rate was not tuned manually (model.py line 146).
4. Appropriate training data
Training data was chosen to keep the vehicle driving on the road. Also, the data provided by Udacity, I used the first track and second track data. The simulator provides three different images: center, left and right cameras. Each image was used to train the model.
For details about how I created the training data, see the next section.
Model Architecture and Training Strategy
1. Solution Design Approach
My first step was to try the LeNet](http://yann.lecun.com/exdb/lenet/) model with three epochs and the training data provided by Udacity. On the first track, the car went straight to the lake. I needed to do some pre-processing. A new Lambda layer was introduced to normalize the input images to zero means. This step allows the car to move a bit further, but it didn’t get to the first turn. Another Cropping layer was introduced, and the first turn was almost there, but not quite.
The second step was to use a more powerfull model: nVidia Autonomous Car Group The only modification was to add a new layer at the end to have a single output as it was required. This time the car did its first complete track, but there was a place in the track where it passes over the “dashed” line. More data was needed. Augmented the data by adding the same image flipped with a negative angle(lines 85 - 87). In addition to that, the left and right camera images where introduced with a correction factor on the angle to help the car go back to the lane(lines 50 - 63). After this process, the car continues to have the same problem with the same “dashed” line. I needed more data, but it was a good beginning.
2. Final Model Architecture
The final model architecture is shown in the following image:
3. Creation of the Training Set & Training Process
To have more data, the following tracks were capture:
- First track.
- One track driving forward.
- One track driving backward.
- Three second track driving forward.
All these data was used for training the model with three epochs. The data was shuffled randomly. The following picture shows the training:
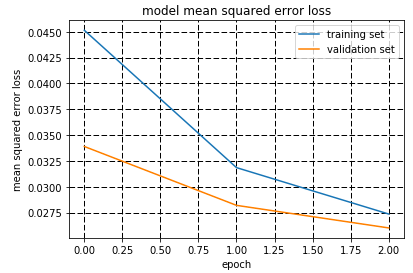
After this training, the car was driving down the road all the time on the first and second track.