FCND-Term1-P2-3D-Motion-Planning
Udacity Flying Car Nanodegree - Term 1 - Project 2 - 3D Motion Planning
This is the second project on Udacity’s Flying Car Nanodegree. It consists of planning and executing a trajectory of a drone in an urban environment. Built on top of the event-based strategy utilized on the first project, the complexity of path planning in a 3D environment is explored. The code communicates with Udacity FCND Simulator using Udacidrone API.
Prerequisites
To run this project, you need to have the following software installed:
- Miniconda with Python 3.6. I had some problems while installing this on my Mac after having an older version install and some other packages install with Homebrew. I have to manually delete all the
~/*conda*directory from my home and then install it withbash Miniconda3-latest-MacOSX-x86_64.sh -b. - Udacity FCND Simulator the latest the better.
Project description
The following are the main code used on the project:
- motion_planning_from_seed_project.py: This is the based implementation for this project provided by Udacity on its seed project.
- planning_utils_from_seed_project.py: It was also provided by Udacity on the its seed project. It contains an implementation of the A* search algorithm in addition to utility functions.
- motion_planning.py: This version extends the provided implementation with the following features:
- The global home location is read from the colliders.csv file.
- The goal location is set from command line arguments (–goal_lat, –goal_lon, –goal_alt).
- The calculated path is pruned with a collinearity function to eliminate unnecessary waypoints.
- planning_utils.py: This file is used by motion_planning.py instead of the seed version. It provides support for the features mention above and also extends the A* search algorithm to include diagonals actions.
Here are some examples of trajectories found with this code:
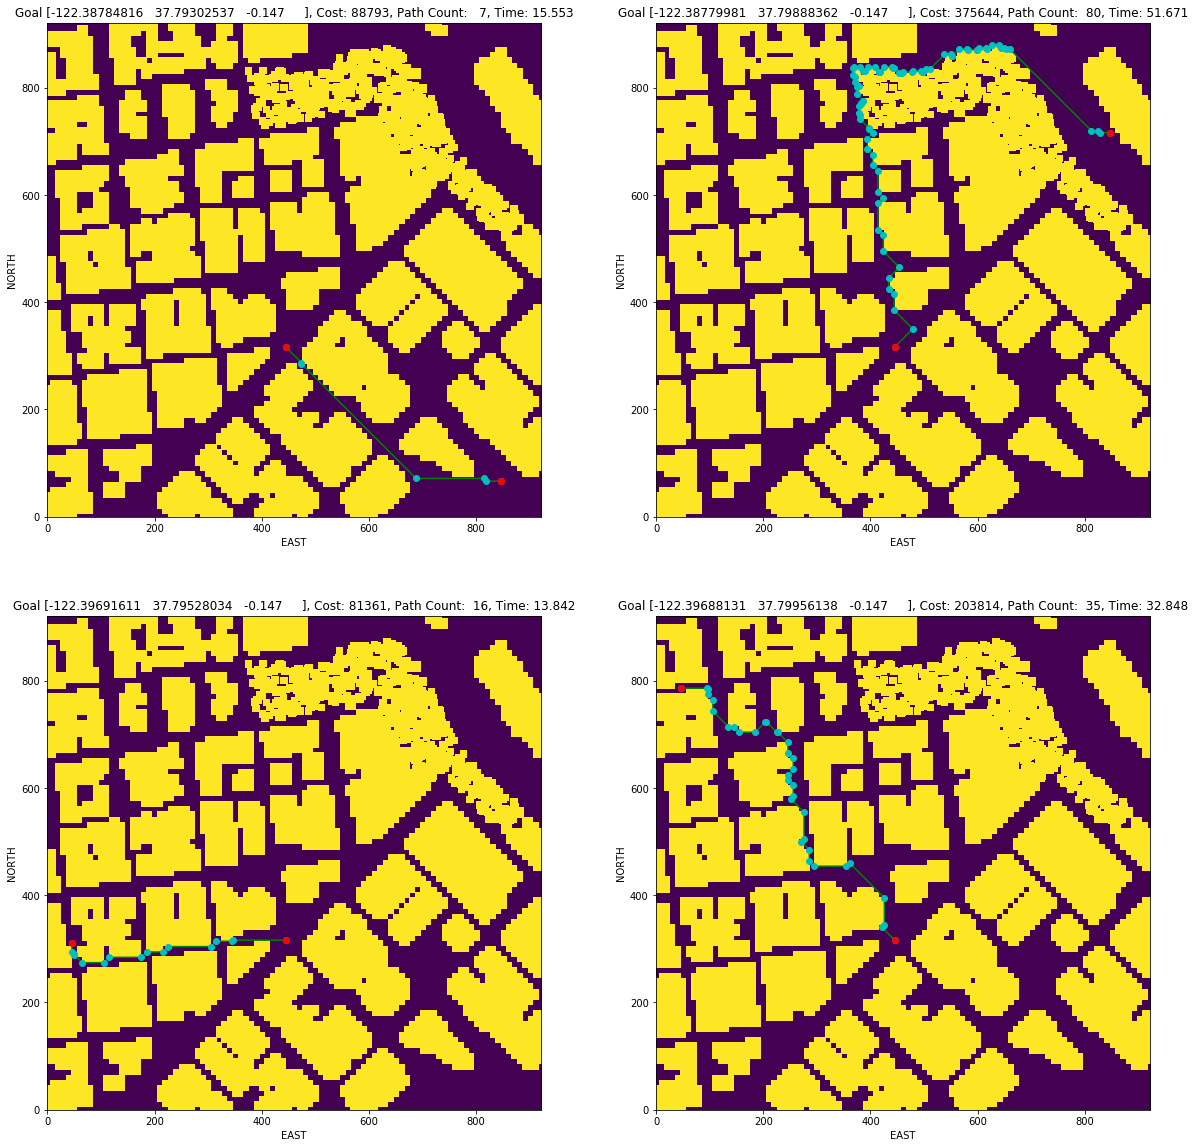
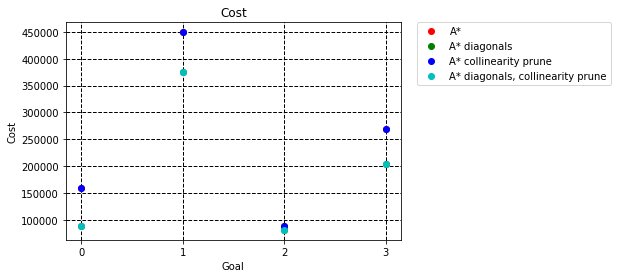
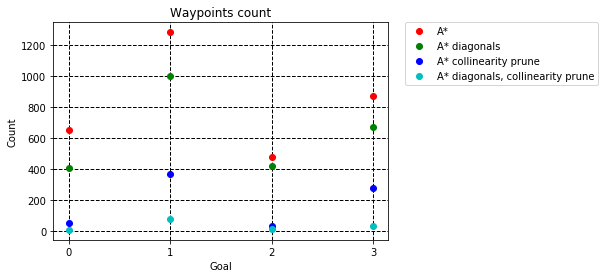
It is interesting to see the how the execution time, cost and waypoint count change with each variation of the algorithm. The following figures show those parameters for the four goals used:

Videos of the drone flying in the simulator:
- Grid Goal 1
- Grid Goal 2
- Grid Goal 3: First part and second part
In addition to that implementation using a grid, the following code use a graph to search for the path to the goal:
- graph_motion_planning: It has the same features as motion_planning.py, but detegates all the searching functionality to the method calculate_waypoints.
- graph_planning_utils.py: Implements a A* search algorithm using a graph calculated from the colliders information.
Here are some examples of trajectories found/no found in this code:
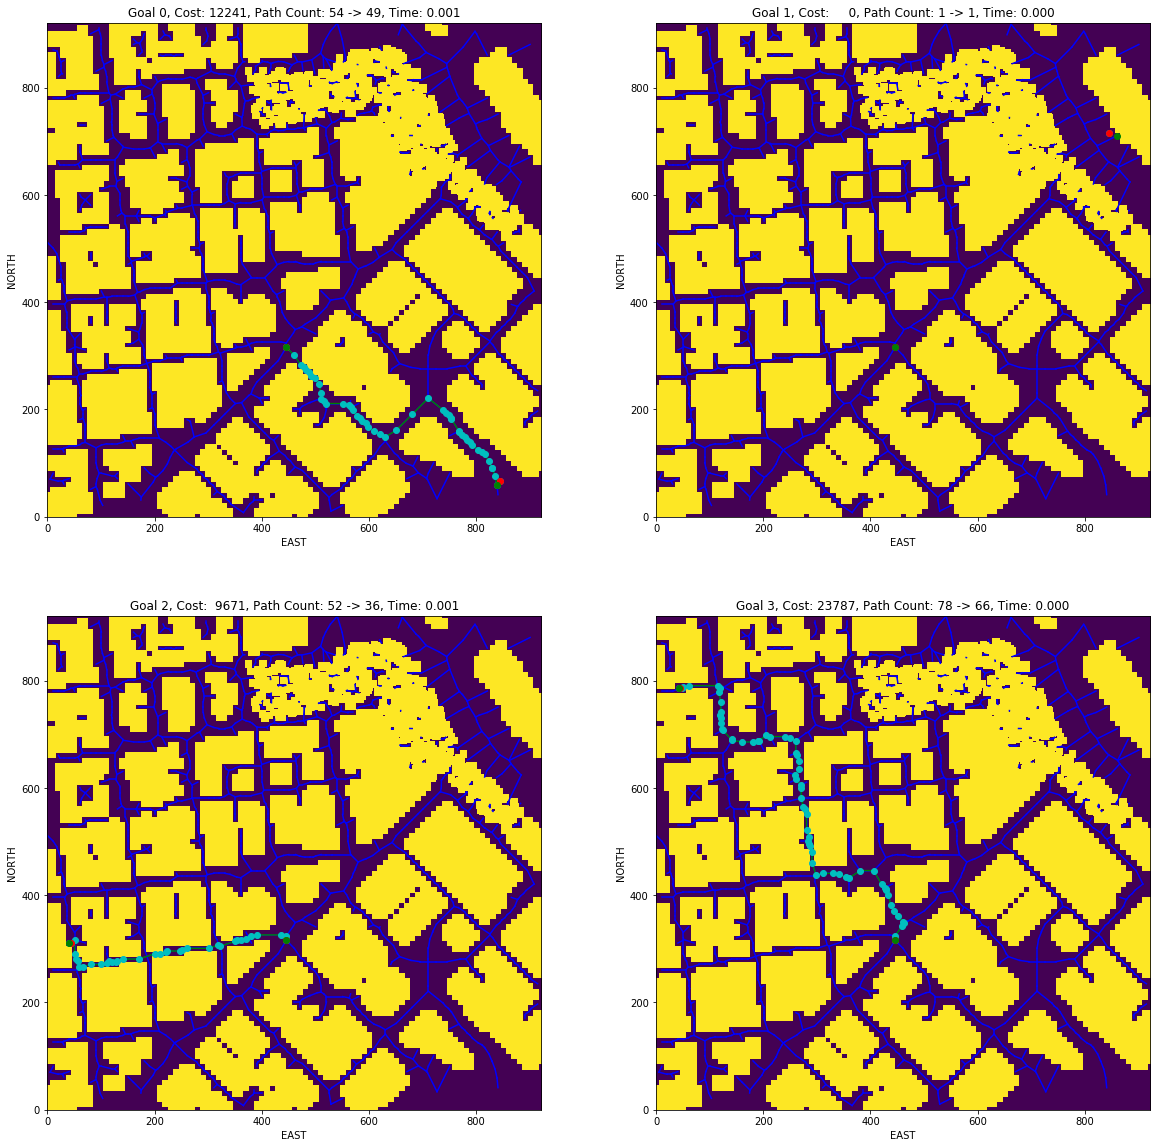
It is interesting to see how much faster this algorithm is compared to an A* on a grid. It is also interesting to see the path was not found in the upper-right position in this case. Another characteristic is waypoint count, in this case, was higher than the one found with A* on a grid.
Videos of the drones flying in the simulator with this trajectories:
- Graph Goal 1
- Graph Goal 2
- Graph Goal 3: First part and second part
Run the Project
To run the code you need to change to the repo directory and create the conda environment with the following command:
conda env create -f environment.yml
Note: This environment configuration is provided by Udacity at the FCND Term 1 Starter Kit repo.
Activate your environment with the following command:
source activate fcnd
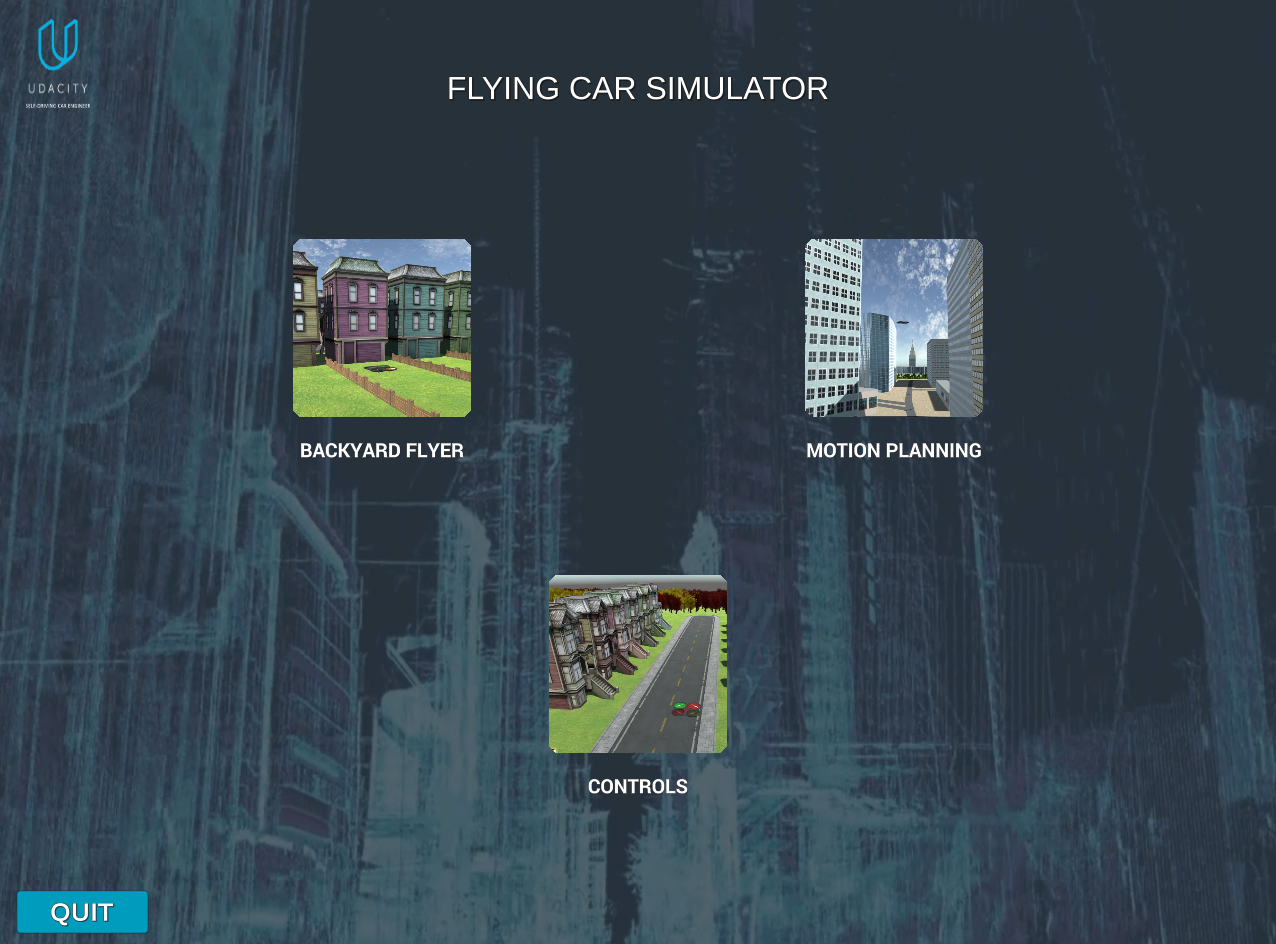
Start the drone simulator. You will see something similar to the following image:
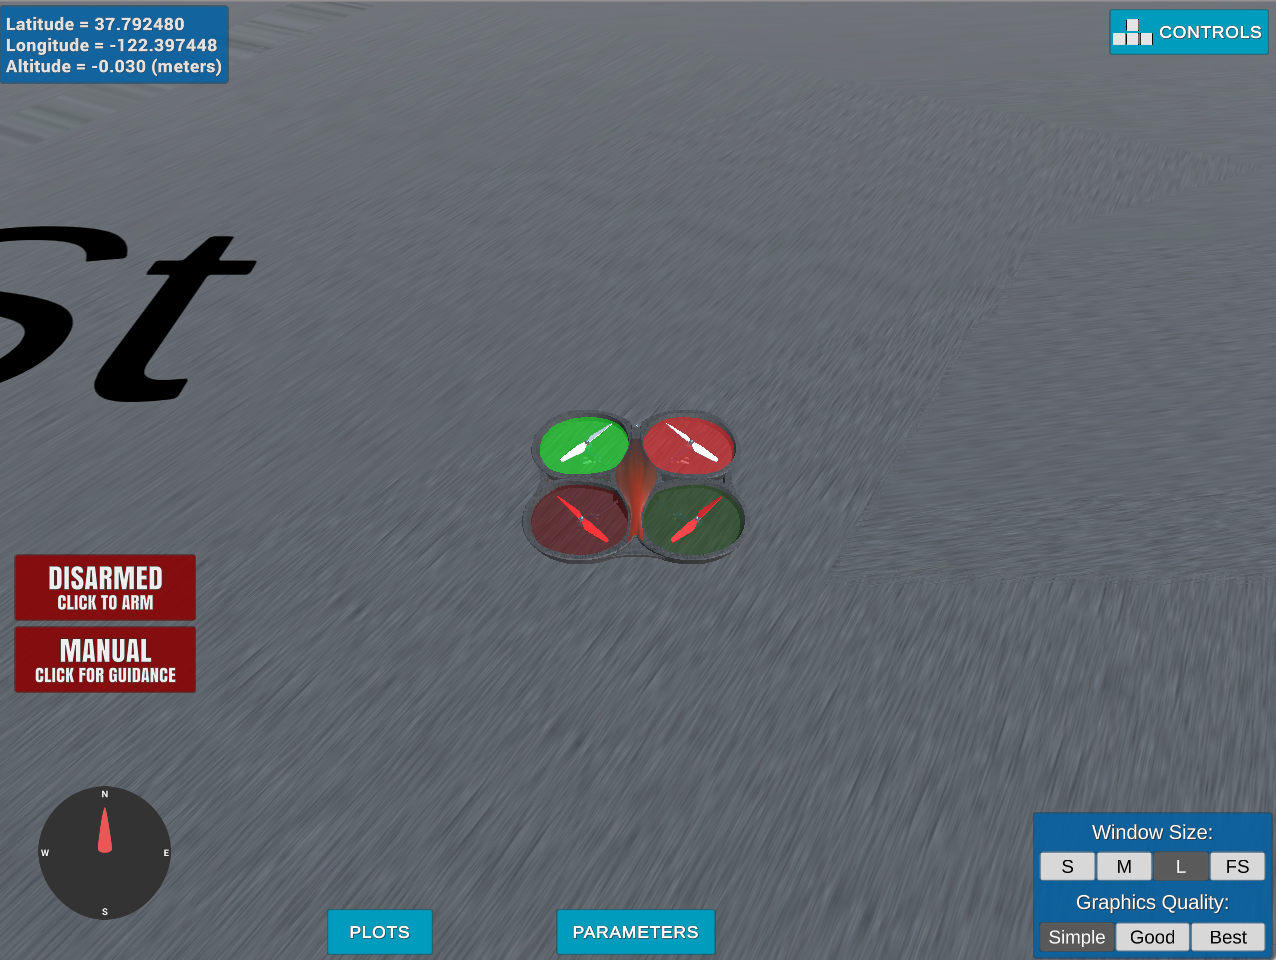
Select the Motion Planning project, and you will get to the following environment:
Now is time to run the code, for the A* grid implementation:
python motion_planning.py --goal_lon -122.40195876 --goal_lat 37.79673913 --goal_alt -0.147
For the graph implementation:
python graph_motion_planning.py --goal_lon -122.40195876 --goal_lat 37.79673913 --goal_alt -0.147
There are examples for different goal coordinates on the following two .sh:
Project Rubric
Writeup
Provide a Writeup / README that includes all the rubric points and how you addressed each one. You can submit your writeup as markdown or pdf.
You’re reading it! Below I describe how I addressed each rubric point and where in my code each point is handled.
Explain the Starter Code
Test that motion_planning.py is a modified version of backyard_flyer_solution.py for simple path planning. Verify that both scripts work. Then, compare them side by side and describe in words how each of the modifications implemented in motion_planning.py is functioning.
Both version are similar in the sense they implement a finite-state machine to command the drone. They are similar but not exactly the same. On the backyard_flyer_solution.py the states and transitions represented are:
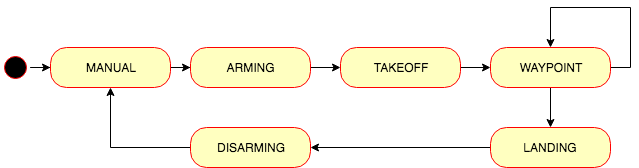
The state machine implemented on motion_planning.py, adds another state to the previous one:
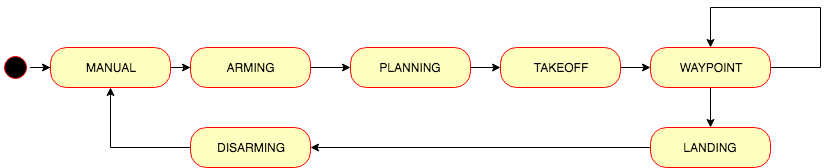
There is a new state, PLANNING, between ARMING and TAKEOFF. When the drone is at the state ARMING and it is actually armed (line 66) on the state_callback method (lines 61 to 72), the transition to PLANNING is executed on the method plan_path. This method responsibility is to calculate the waypoints necessary for the drone to arrive at its destination.
On the plan_path method:
- The map is loaded (line 133)
- The grid is calculated at line 136 using the method
create_gridfrom the moduleplanning_utils.py. - The goal grid is set 10 north and east from local position on line 144.
- To find the path to the goal, A* search algorithm is executed on line 151 using the
a_starmethod from the moduleplanning_utils.py. - The waypoints are generated at line 157, and they are sent to the simulator using the method
send_waypointsat line 161.
Implementing Your Path Planning Algorithm
In the starter code, we assume that the home position is where the drone first initializes, but in reality, you need to be able to start planning from anywhere. Modify your code to read the global home location from the first line of the colliders.csv. file and set that position as global home (self.set_home_position())
The home position is read at motion_planning.py line 124. It use the function read_home added to planning_utils.py.
In the starter code, we assume the drone takes off from map center, but you’ll need to be able to takeoff from anywhere. Retrieve your current position in geodetic coordinates from self._latitude(), self._longitude() and self._altitude(). Then use the utility function global_to_local() to convert to local position (using self.global_home() as well, which you just set)
This coordinates transformation is done at line 130.
In the starter code, the start point for planning is hardcoded as map center. Change this to be your current local position.
The grid star point is calculated from line 144 to 146.
In the starter code, the goal position is hardcoded as some location 10 m north and 10 m east of map center. Modify this to be set as some arbitrary position on the grid given any geodetic coordinates (latitude, longitude)
Three new parameters were added to the motion_planning.py to accept goals coordinates. The coordinates are converted to local coordinates at lines 151 to 152 to be used on the search algorithm.
Write your search algorithm. Minimum requirement here is to add diagonal motions to the A* implementation provided, and assign them a cost of sqrt(2). However, you’re encouraged to get creative and try other methods from the lessons and beyond!
The diagonals movements were implemented by adding them to the Action enum. The valid_actions method was modified to take those actions into account. Here is an example of the A* trajectories on a grid:
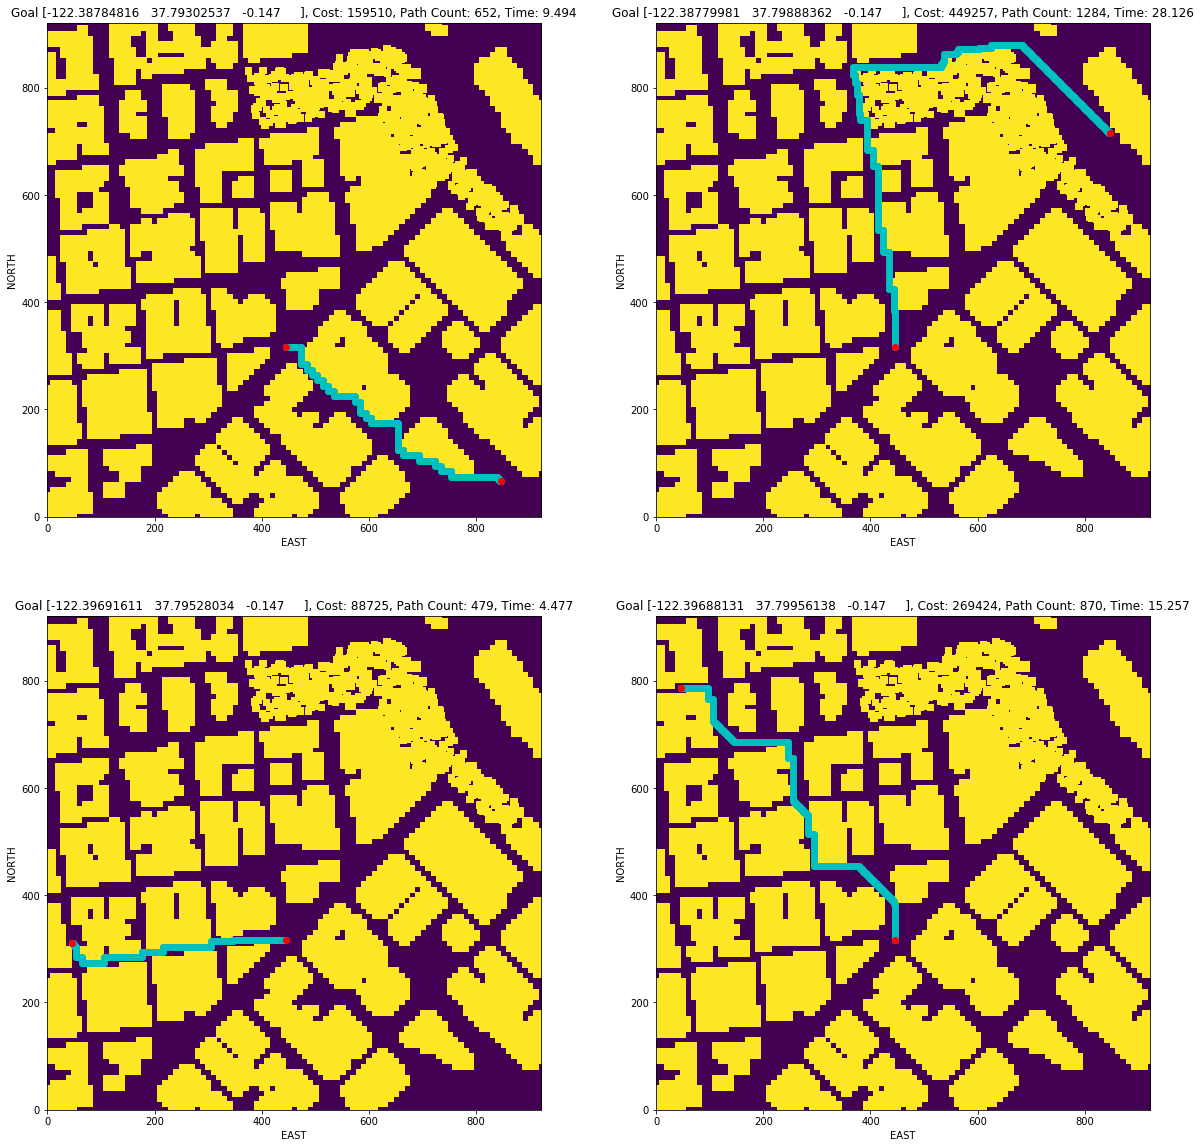
When the diagonal actions are implemented, the trajectories to the same goals changed:

Cull waypoints from the path you determine using search.
The path was pruned at line 162 using collinearity(collinearity_prune function) with the method provided by the lectures. The trajectories after this transformation are:
Executing the flight
This is simply a check on whether it all worked. Send the waypoints, and the autopilot should fly you from start to goal!
The following are links to videos directing the drone to different locations:
- Grid Goal 1
- Grid Goal 2
- Grid Goal 3: First part and second part