A simulator is an essential tool to have if you want to start playing with almost anything in reality. It will save you a lot of time and money. If you plan to have a distributed team to work on project, it is almost impossible to have all team member with the same hardware and environment to work, but it is entirely possible to ensure a set of specification(Ex. operating system, computer hardware, etc.) and have them work on the same repo with a proper simulator. If your project is about a drone, you need to find a drone simulator on the right platform. ROS is a great platform I get in touch with on Udacity’s Self-driving Car Engineer Nanodegree. After finishing Udacity’s Flying Car Nanodegree, I kept thinking on how to put those together. This post is the first step on my journey to enjoy a good drone simulator integrated with ROS in Ubuntu.
ROS installation
I installed Ubuntu 16.04 as ROS Kinetic Kame is the recommended distribution these days, and it was the one I used on the Self-Driving Car Nanodegree. The installation was not part of the nanodegree as they provide a virtual machine with all that you need, but it was not hard to follow the steps here. ROS was installed.
Finding a simulator
Great! How can I get a simulator based on Gazebo to enjoy its excellent integration with ROS. Google-ing it; I found this post Using ROS with UAVs. Hector Quadrotor looks like an excellent option to try. The steps where clear on that post but they were for Indigo, and I had Kinetic. Here are the steps I follow. I used Hector Quadrotor tutorial too.
Installing Hector Quadrotor
Instead of installing the package(hecto_quadrotor), I choose to install from the source. The information available on both tutorials were not for kinetic, but it was easy to figure out:
mkdir ~/hector_quadrotor_tutorial
cd ~/hector_quadrotor_tutorial
wstool init src https://raw.github.com/tu-darmstadt-ros-pkg/hector_quadrotor/kinetic-devel/tutorials.rosinstall
Then it was time to make it:
catkin_make
...
-- Could not find the required component 'geographic_msgs.' The following CMake error indicates that you either need to install the package with the same name or change your environment so that it can be found.
CMake Error at /opt/ros/kinetic/share/catkin/cmake/catkinConfig.cmake:83 (find_package):
  Could not find a package configuration file provided by "geographic_msgs"
  with any of the following names:

    geographic_msgsConfig.cmake
    geographic_msgs-config.cmake

  Add the installation prefix of "geographic_msgs" to CMAKE_PREFIX_PATH or
  set "geographic_msgs_DIR" to a directory containing one of the above files.
  If "geographic_msgs" provides a separate development package or SDK, be
  sure it has been installed.
....
Missing geographic_msgs package:
sudo apt-get install ros-kinetic-geographic-info
Here we go again:
catkin_make
...
-- Could not find the required component 'hardware_interface'. The following CMake error indicates that you either need to install the package with the same name or change your environment so that it can be found.
CMake Error at /opt/ros/kinetic/share/catkin/cmake/catkinConfig.cmake:83 (find_package):
  Could not find a package configuration file provided by
  "hardware_interface" with any of the following names:

    hardware_interfaceConfig.cmake
    hardware_interface-config.cmake

  Add the installation prefix of "hardware_interface" to CMAKE_PREFIX_PATH or
  set "hardware_interface_DIR" to a directory containing one of the above
  files.  If "hardware_interface" provides a separate development package or
  SDK, be sure it has been installed.
...
Missing hardware_interface package. This one was harder to find because it belongs to ros-control package:
sudo apt-get install ros-kinetic-ros-control
Here we go again:
catkin_make
...
-- Could not find the required component 'gazebo_ros_control'. The following CMake error indicates that you either need to install the package with the same name or change your environment so that it can be found.
CMake Error at /opt/ros/kinetic/share/catkin/cmake/catkinConfig.cmake:83 (find_package):
  Could not find a package configuration file provided by
  "gazebo_ros_control" with any of the following names:

    gazebo_ros_controlConfig.cmake
    gazebo_ros_control-config.cmake

  Add the installation prefix of "gazebo_ros_control" to CMAKE_PREFIX_PATH or
  set "gazebo_ros_control_DIR" to a directory containing one of the above
  files.  If "gazebo_ros_control" provides a separate development package or
  SDK, be sure it has been installed.
...
Missing yet another package gazebo-ros-control:
sudo apt-get install ros-kinetic-gazebo-ros-control
And this time catkin_make finished successfully:
carkin_make
....
[100%] Built target hector_quadrotor_pose_estimation
[100%] Built target hector_quadrotor_pose_estimation_nodelet
Running the outdoor-flight demo
We are ready to have fun now. After sourcing the workspace (source devrel/setup.batch), both tutorials explain how to run the demo simulator with this command for an outdoor demo:
roslaunch hector_quadrotor_demo outdoor_flight_gazebo.launch
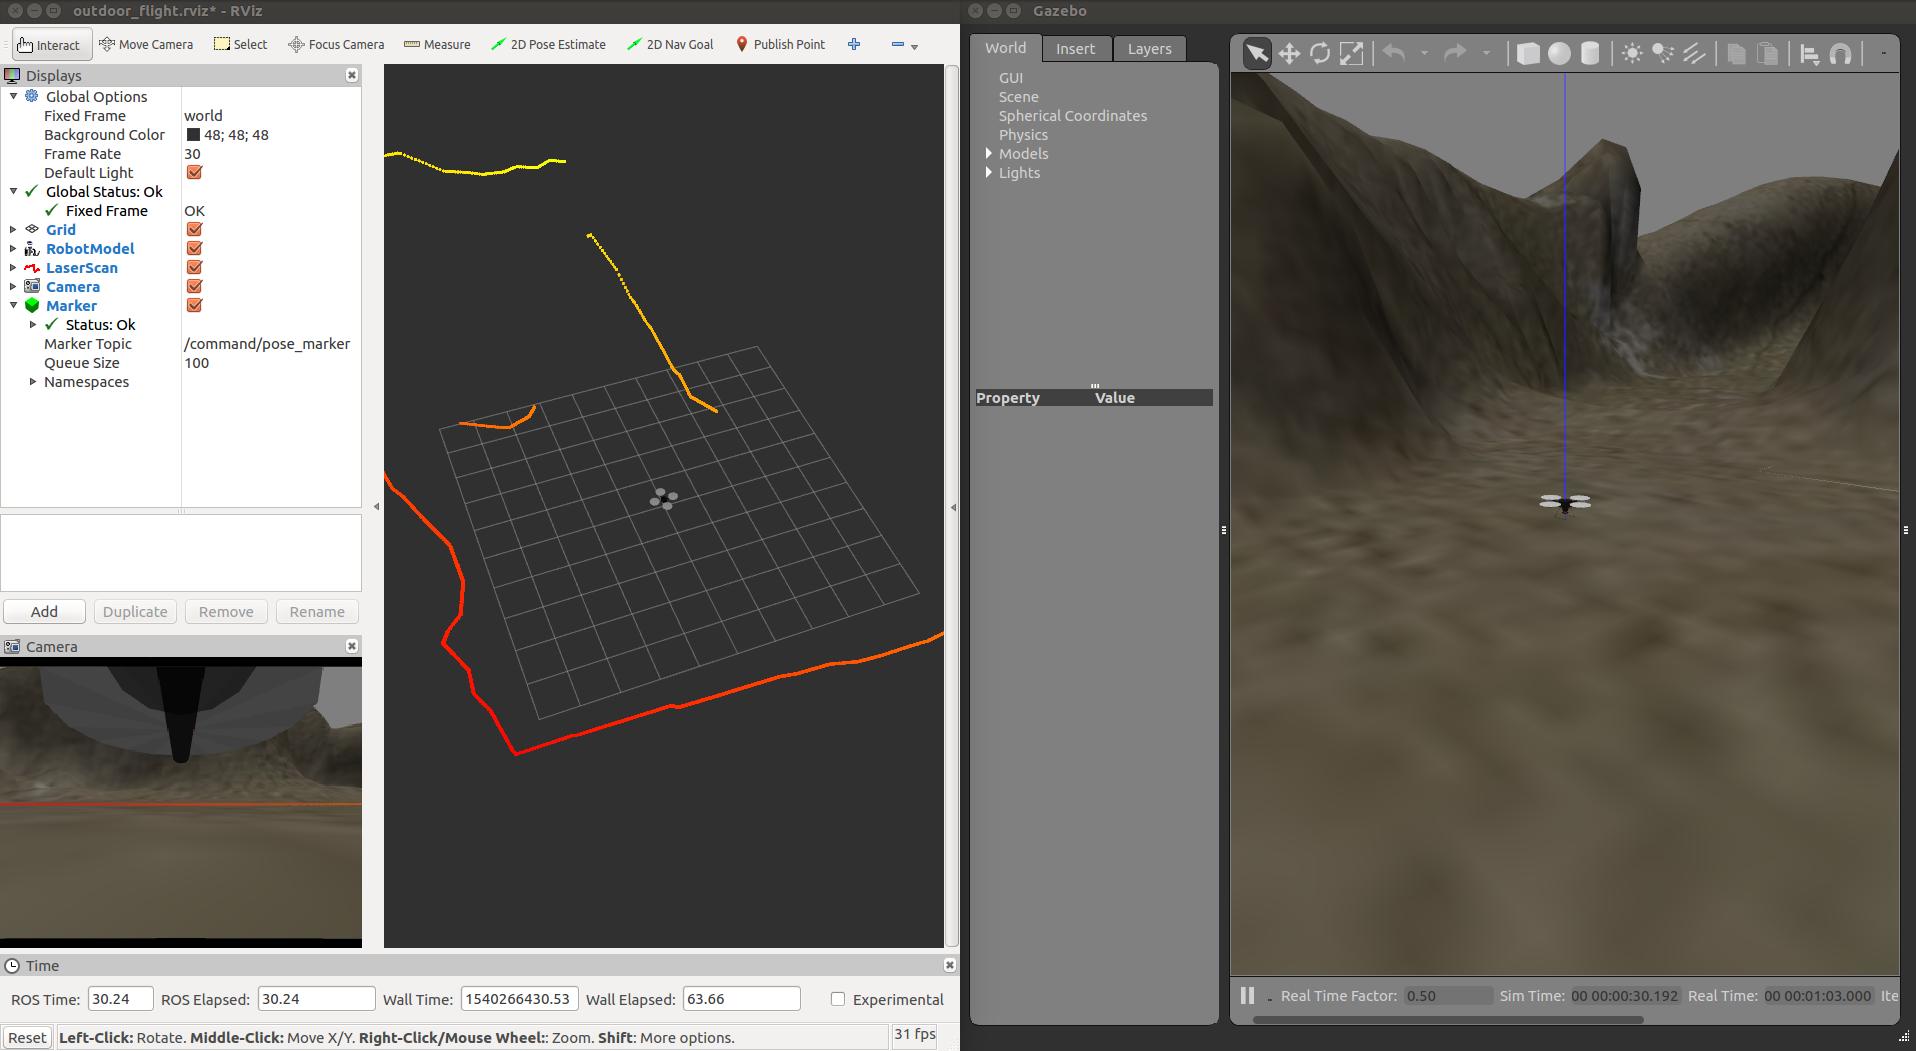
And rviz and Gazebo start:

I noticed there is an error:
ERROR: cannot launch node of type [joy/joy_node]: joy
ROS path [0]=/opt/ros/kinetic/share/ros
ROS path [1]=/home/darienmt/projects/github/hector_quadrotor_tutorial/src
ROS path [2]=/opt/ros/kinetic/share
The joy package was not installed:
sudo apt-get install ros-kinetic-joy
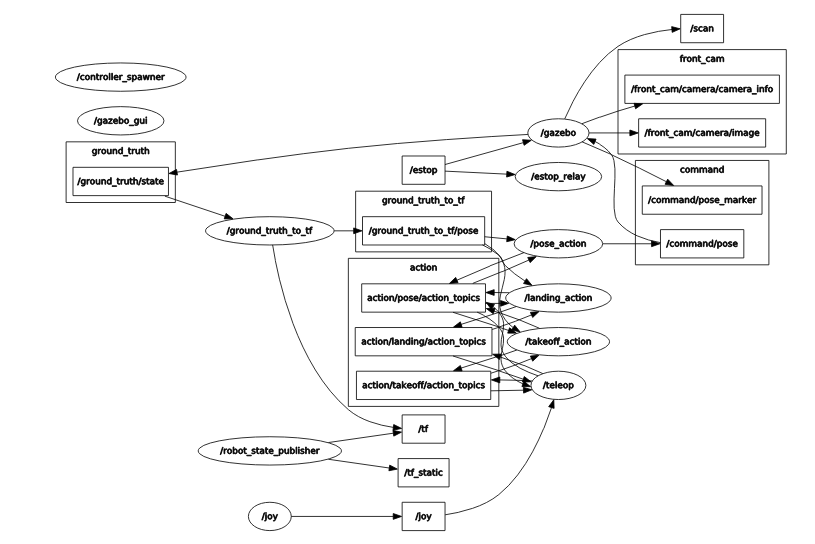
And the error went away. Here is rqt_graph showing all nodes and topics:

To get this graph, use the following command:
rosrun rqt_graph rqt_graph
and select Nodes/topics(all)
Flying the drone
There are two ways to control the drone in this demo: keyboard or XBox controller. Let’s give them a try!
Using keyboard
Based on the demo tutorial, we need to enable the motors and then run the teleop_twist_keyboard package. First, we need to install that package:
sudo apt-get install ros-kinetic-teleop-twist-keyboard
Then, enable the motors:
rosservice call /enable_motors "enable: true"
success: True
and start the teleop launch:
rosrun teleop_twist_keyboard teleop_twist_keyboard.py
Here is how it looks:
You can see on the left side of the screen a RViz view including the quadrotor camera at the bottom-left, and Gazebo on the right side. It was fun but tough to control with the keyboard as you can see on that video ;-)
Using XBox controller
A friend of mine gave me an XBox controller, and this was a perfect opportunity to use it. Following the Using ROS with UAVs instructions, we need to set up the controller parameters:
rosparam set /quadrotor_teleop/x_axis 5
rosparam set /quadrotor_teleop/y_axis 4
rosparam set /quadrotor_teleop/yaw_axis 1
rosparam set /quadrotor_teleop/z_axis 2
Connect the XBox controller to a USB port before launching the package:
roslaunch hector_quadrotor_demo outdoor_flight_gazebo.launch
Then enable the motors:
rosservice call /enable_motors "enable: true"
success: True
and launch the XBox controller:
roslaunch hector_quadrotor_teleop xbox_controller.launch
Here we go:
Even though it might not look like that on the video because I am not a good pilot, this time it was much easier to control the drone. In this video, you can see more easily the laser scan data on rviz as the drone moves.
Conclusions
So far, to get a drone simulator with ROS was not that hard. Just a few missing packages and that’s it. I am sure this is the hard way to get it because it was compiled instead of installing the package from the repo. The full hector_quadrotor package info is available, and the limits are only in our imagination.
Happy Flying!