The PX4 Firmware is big, and it is effortless to get lost there. You want to see the drone hovering and get a feel of what is going on without getting distracted by all the code that is in the firmware. You have already had the code to do that on MAVROS Offboard control example. What is needed is to put that code together on a ROS node, and execute PX4 SITL + Gazebo + MAVROS. That could sound like an alien is talking to you, and it is confusing. Let’s walk through that example.

Getting the PX4 Firmware
Let’s suppose you create a git repo, and you are at the root of that repo. The first step is to get the PX4 Firmware.
Assuming you don’t want to change the firmware, it could be good to set it up outside your src/ because it is not your source in that case. Git submodules is here for the rescue. You can add the firmware a module:
git submodule add git@github.com:PX4/Firmware.git px4-firmware
Even when you don’t want to deal with it, you do need to compile it.
cd px4-firmware
make px4_sitl_default gazebo
Note: posix_sitl_default was deprecated.
Close gazebo. If you run into any missing libraries or problems, there is extensive documentation on Installing Files and Code. You can also visit another post in this blog for a tutorial on how to do it.
Installing MAVROS
MAVROS will allow you to communicate with the drone or simulator in this case.
Install mavros package following:
sudo apt-get install ros-kinetic-mavros-msgs
sudo apt-get install ros-kinetic-mavros ros-kinetic-mavros-extras
Note: If you don’t install the geographic lib dataset you get something like this:
[FATAL] [1543039326.499798143]: UAS: GeographicLib exception: File not readable /usr/share/GeographicLib/geoids/egm96-5.pgm | Run install_geographiclib_dataset.sh script in order to install Geoid Model dataset!
I don’t know how I learn that… So, we need to install it:
wget https://raw.githubusercontent.com/mavlink/mavros/master/mavros/scripts/install_geographiclib_datasets.sh
chmod +x ./install_geographiclib_datasets.sh
sudo ./install_geographiclib_datasets.sh
Creating the package
Let’s create the src/ directory for our workspace:
mkdir src
cd src
Now, we are ready to create the package offb, as suggested by the example. This package will have a couple of dependencies:
catkin_create_pkg offb std_msgs roscpp geometry_msgs mavros_msgs
Create a file named offb_node.cpp in the offb package src/ directory.
touch offb/src/offb_node.cpp
Paste the code from https://dev.px4.io/en/ros/mavros_offboard.html there.
In the project offb/CMakeList.txt uncomment the lines:
add_executable(${PROJECT_NAME}_node src/offb_node.cpp)

# and

target_link_libraries(${PROJECT_NAME}_node
   ${catkin_LIBRARIES}
)
Compile the package from the workspace root:
cd ..
catkin_make
It will create the executable in devel/lib/offb/offb_node.
We need a launch file to launch our node (offb) and PX4 + Gazebo + MAVROS. There is a launch file we could see inside the firmware: mav_ros_posix_silt.launch. This launch file has all we need. Let’s include it on ours. Create the launch file for the offb package:
mkdir -p offb/launch
touch offb/launch/offb.launch
And copy the following there:
<?xml version="1.0"?>
<launch>
    <include file="$(find px4)/launch/mavros_posix_sitl.launch"/>

    <node name="offb" pkg="offb" type="offb_node" output="screen"/>
</launch>
Done. Let’s fly! Not yet. What is this px4 package to be found there? The PX4 firmware could be seen a “package” as well, but you need to let ROS know where it is. The information about how to launch it with a ROS Wrapper is here. We can do it with a script. Create a script called launch-common.sh to encapsulate this logic and reuse it:
touch launch-common.sh
And copy the following on it:
#!/bin/bash

px4_dir=$(pwd)/px4-firmware

source $px4_dir/Tools/setup_gazebo.bash $px4_dir $px4_dir/build/posix_sitl_default

export ROS_PACKAGE_PATH=$ROS_PACKAGE_PATH:$px4_dir
export ROS_PACKAGE_PATH=$ROS_PACKAGE_PATH:$px4_dir/Tools/sitl_gazebo
This will be in the root of the repo, so we can source it any script you want to know about your PX4 submodule. Let’s create a script now to launch our example package:
touch launch-offb.sh
chmod +x launch-offb.sh
And copy the following inside it:
#!/bin/bash

source ./launch-common.sh

roslaunch offb offb.launch
Now it is time to fly! Source your workspace and go:
source devel/setup.bash
./launch-offb.sh
It will take a couple of seconds, but hopefully, Gazebo will start, and you will see the drone hovering like in this video:
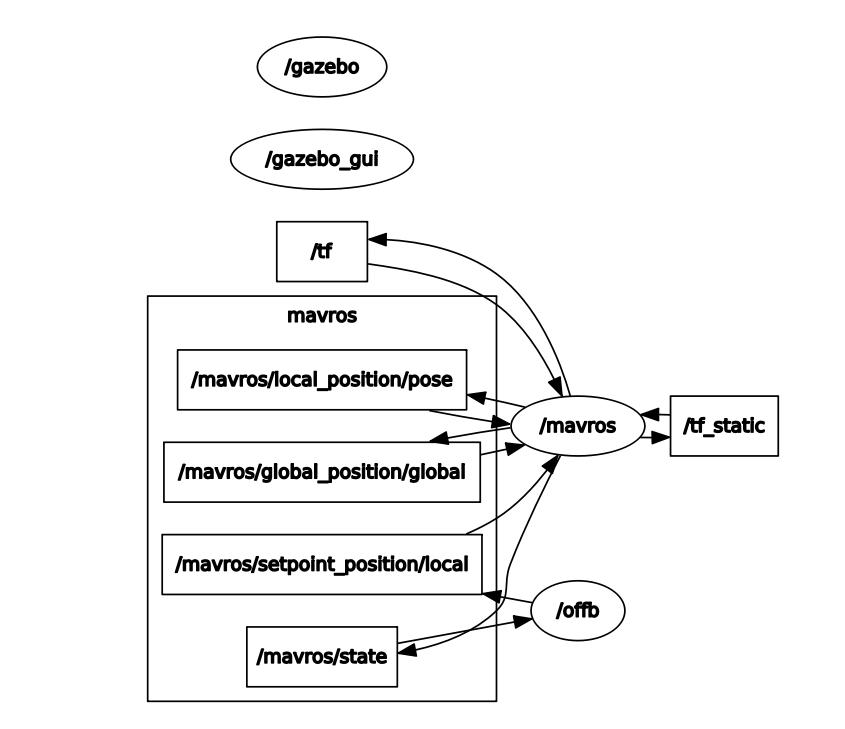
Let’s take a look at some graphs. Open a new terminal for rosrun rqt_graph rqt_graph:

Conclusions
Now you have a project set with a node commanding the drone to hover. There are a couple of things to notice:
- PX4 Firmware is outside your code: You can stop worrying about it because you are not changing it. It is a dependency to your project.
- Everything is launched with a single command: Let’s work to do on every star/stop of the scenario you are testing.
- This is just starting ;-)
All this setup could be found here.
Happy droning!